참고자료:https://openlabpro.com/guide/ble-notify-on-esp32-controller/
개발 환경: mac os, ios
오늘 할 예제의 내용을 간단하게 설명 하겠다.
esp32 dev kit v1에 내장된 hall sensor 를 이용하여 주변 자기장을 측정한다.
블루투스통신을 이용하여 스마트폰으로 측정된 수치를 전송한다.
예제를 시작하기 전에 먼저
아두이노 ide를 설치한다.
아래 주소로 들어가 자신의 환경에 맞는 아두이노 소프트웨어를 설치한다.
https://www.arduino.cc/en/software
Software
Open-source electronic prototyping platform enabling users to create interactive electronic objects.
www.arduino.cc
설치 후 아래와 같은 경로로 환경설정창을 열어준다.

아래의 사진에서 additional boards manager urls 에
"https://raw.githubusercontent.com/espressif/arduino-esp32/gh-pages/package_esp32_dev_index.json"
이것을 넣는다.

입력했다면 아래 사진과 같이 tools->board->boards manager.. 를 클릭

esp32 를 입력한 후 install을 진행한다.

다 했다면 아래 사진과 같이 자신이 사용할 보드를 선택한다.

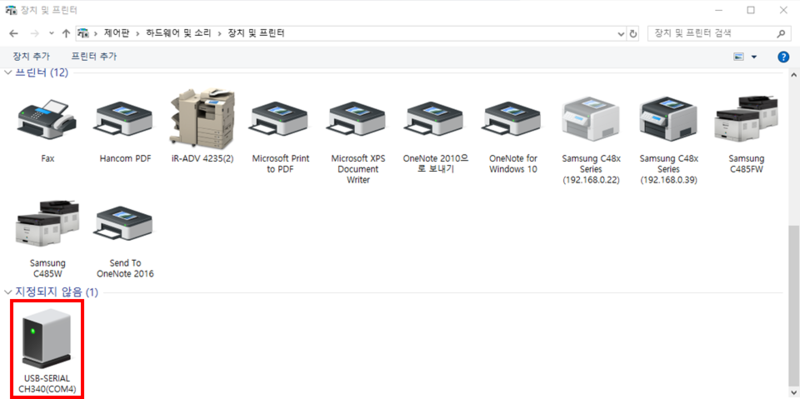
윈도우즈 사용자라면 아래와 사진처럼 포트를 쉽게 찾을 수 있다.
찾았다면 tools->port에서 찾은 포트를 연결할 수 있다.
mac os 환경이라면 아래 주소를 참고하여 포트를 연결하길 바란다.
https://velog.io/@jeon328kr/Arduino-IDE에-ESP32-보드-설치-방법-mac-os
Arduino IDE에 ESP32 보드 설치, 포트 설정, 예제 (mac os)
Arduino IDE에 ESP32 보드를 개발환경을 구축해보자
velog.io
이렇게 준비를 마쳤으면 아래 사진에 보이는 ble_server예제를 클릭한다.

클릭 후 코드를 아래와 같이 수정한다.
/*
    Based on Neil Kolban example for IDF: https://github.com/nkolban/esp32-snippets/blob/master/cpp_utils/tests/BLE%20Tests/SampleServer.cpp
    Ported to Arduino ESP32 by Evandro Copercini
    updates by chegewara
*/

#include <BLEDevice.h>
#include <BLEUtils.h>
#include <BLEServer.h>
#include <BLE2902.h>

// See the following for generating UUIDs:
// https://www.uuidgenerator.net/

#define SERVICE_UUID        "4fafc201-1fb5-459e-8fcc-c5c9c331914b"
#define CHARACTERISTIC_UUID "beb5483e-36e1-4688-b7f5-ea07361b26a8"

bool deviceConnected = true;
BLECharacteristic *pCharacteristic;


void setup() {
  Serial.begin(115200);
  Serial.println("Starting BLE work!");

  BLEDevice::init("Long name works now");
  BLEServer *pServer = BLEDevice::createServer();
  BLEService *pService = pServer->createService(SERVICE_UUID);
  pCharacteristic = pService->createCharacteristic(
                                         CHARACTERISTIC_UUID,
                                         BLECharacteristic::PROPERTY_READ |
                                         BLECharacteristic::PROPERTY_WRITE|
                                         BLECharacteristic::PROPERTY_NOTIFY
                                       );

  pCharacteristic->setValue("Hello World says Neil");
  pService->start();
  // BLEAdvertising *pAdvertising = pServer->getAdvertising();  // this still is working for backward compatibility
  BLEAdvertising *pAdvertising = BLEDevice::getAdvertising();
  pAdvertising->addServiceUUID(SERVICE_UUID);
  pAdvertising->setScanResponse(true);
  pAdvertising->setMinPreferred(0x06);  // functions that help with iPhone connections issue
  pAdvertising->setMinPreferred(0x12);
  BLEDevice::startAdvertising();
  Serial.println("Characteristic defined! Now you can read it in your phone!");
}

void loop() {
  // put your main code here, to run repeatedly:
  if(deviceConnected){
    int measurement = 0;
    measurement = hallRead();
    pCharacteristic->setValue(measurement);
    pCharacteristic->notify();
    Serial.println("Sent value : " + String(measurement));
  }

  delay(2000);
}
esp32 를 연결한 후 왼쪽 위 V버튼(컴파일)을 누르고 기다린다. 다 됐으면
->버튼(업로드)을 누른다.

아래 사진 처럼 connecting 이 나올때 esp32칩에 보이는 BOOT 버튼을 꾹 누르고 있어야 업로딩이 완료된다.

아이폰은 아래 어플을 다운받으면 되겠다.

안드로이드 스마트폰은 아래 주소를 참고 부탁한다.
https://diyver.tistory.com/162
아두이노와 블루투스모듈 ZS-040로 스마트폰과 통신하기
<목표> - 아두이노와 스마트폰간의 통신을 하려면 블루투스 모듈을 사용해야 한다. 이번 시간에는 ZS-040 블루투스 모듈을 사용하여 아두이노에서 스마트폰으로 신호를 보내고, 수신하는 방법을
diyver.tistory.com
이제 esp32가 마스터 블루투스를 찾고 있다. 우리는 스케치 코드에서 esp32를 "Long name works now"라는 이름으로 블루투스를 생성했다. 블루투스 터미널 어플에서 그 이름을 찾아 연결하자.

연결한 후 아두이노 ide에서 오른쪽 위에 돋보기 모양버튼(시리얼 모니터)를 클릭하면 esp32에서 측정한 자기장을 출력해준다.
또한 동시에 블루투스 터미널로 그 수치를 전송한다. 아래 동영상에서 확인해 보자.
이렇게 블루투스 통신예제를 해보았습니다.
'esp32' 카테고리의 다른 글
| 아두이노 개발 환경에서 esp32 fft(Fast Fourier transform) 예제 다뤄보기 (0) | 2022.10.03 |
|---|---|
| 4. i2c_simple_main.c 분석 (0) | 2022.08.02 |
| 3. uart_async_rxtxtasks_main.c 분석 (0) | 2022.07.28 |
| 2. blink_example_main.c 분석 (0) | 2022.07.24 |
| 1. hello_world_main.c 분석 (0) | 2022.07.04 |